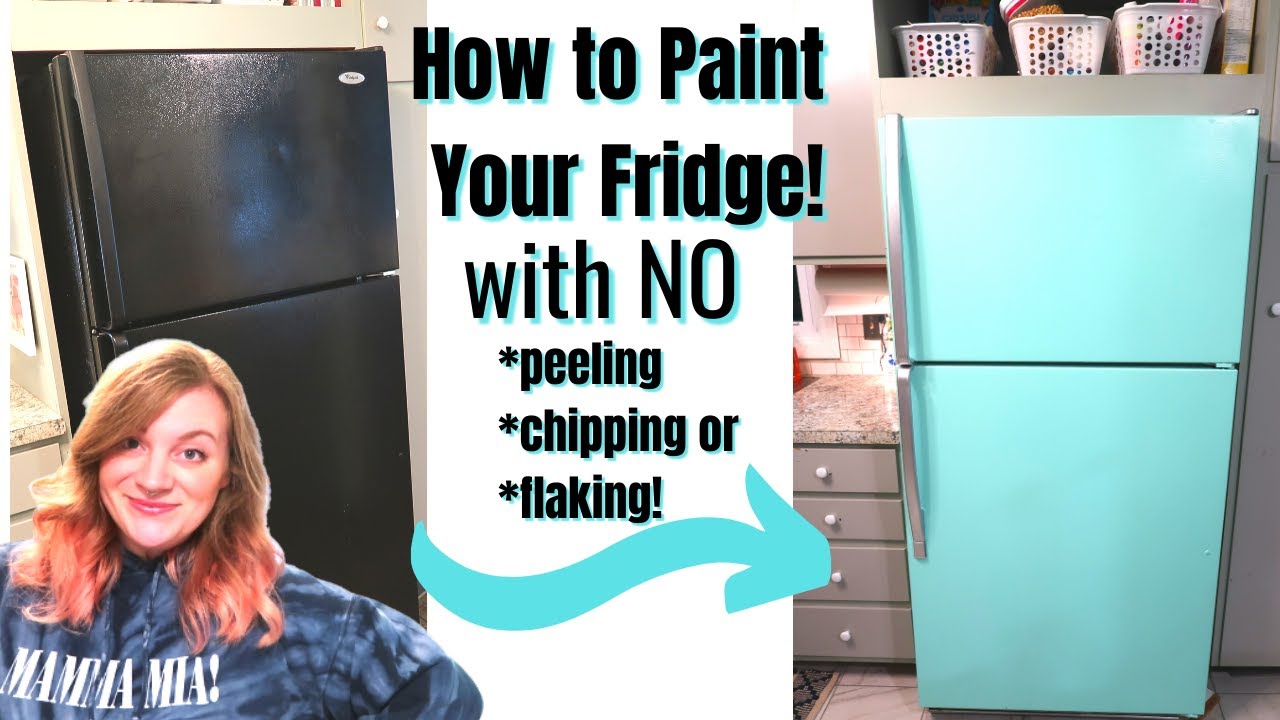
DIY Retro Refrigerator: Get a SMEG-Style Look for Under $40
Ever gazed longingly at those iconic, colorful retro refrigerators, imagining one brightening your kitchen, only to balk at the hefty price tag? The coveted Smeg aesthetic, with its vibrant hues and vintage charm, often feels like a luxury out of reach for most budgets. But what if we told you that achieving this dream look for your kitchen is not only possible but incredibly budget-friendly, often costing less than $40? That's right – your dated, drab refrigerator can be transformed into a stunning, Smeg-inspired centerpiece with a little DIY magic and the right approach to how to paint a refrigerator.
Whether you're moving into a new home with specific decor needs, like an Oxonian who found their perfect turquoise kitchen, or simply yearning to inject some personality into your existing space, painting your refrigerator offers an unbeatable solution. It's a remarkably straightforward project that allows for immense customization, from bold, tropical shades to elegant pastels, ensuring your new-look fridge perfectly complements your home's unique style. Forget compromising on aesthetics; it's time to create a bespoke appliance that truly reflects you.
Why Paint Your Refrigerator? The Smeg-Style Dream on a Budget
The allure of a retro refrigerator goes beyond mere refrigeration; it’s a statement piece, a pop of color, and a nod to timeless design. Brands like Smeg have capitalized on this nostalgia, offering appliances that double as kitchen art. However, purchasing a brand-new retro fridge can set you back thousands. This is where the DIY approach shines.
Learning how to paint a refrigerator isn't just about saving money; it's about empowerment. You gain the freedom to choose any color imaginable, allowing your appliance to seamlessly integrate with or boldly contrast your existing kitchen palette. Imagine a vibrant turquoise fridge in an open-plan kitchen with skylights, or a cheerful pink one reminiscent of charming retro aesthetics – the possibilities are endless. This project offers a truly personalized kitchen refresh without the financial strain. Plus, upcycling your existing appliance is an eco-friendly choice, giving your old fridge a second life instead of sending it to the landfill. For more insights on budget-friendly kitchen updates, check out our guide on How to Paint Your Refrigerator: Low-Cost Guide to a Kitchen Refresh.
Gathering Your Arsenal: Essential Tools for a Fridge Makeover
Before you dive into transforming your appliance, ensuring you have the right tools and materials is paramount. The beauty of this project is that the equipment needed is minimal and relatively inexpensive, keeping you well within that under-$40 budget.
- Small Paint Roller: While a paintbrush can be used, a high-density foam roller is highly recommended. It provides a smoother, streak-free finish and superior coverage, mimicking the factory look more effectively. Look for smaller sizes that are easy to maneuver.
- Primer for Metal: This is a non-negotiable step for durability and adhesion. Using a primer specifically formulated for metal surfaces ensures your paint sticks properly, preventing chipping and providing an even base for your chosen color.
- The Paint: The type of paint you choose is crucial.
- For Metal Surfaces: Always opt for paint designed for metal. This ensures it adheres well and withstands temperature fluctuations.
- Finish Preference: Consider a silk or semi-gloss texture. These finishes are more forgiving than matte or eggshell, which can highlight every fingerprint, smudge, and minor imperfection. A slight sheen also echoes the classic retro appliance look.
- Color Choice: This is where your creativity truly shines! Whether you're aiming for a bold "Tropicana" turquoise or a classic creamy white, choose a color that inspires you. Remember that colors can appear different in various lighting conditions. It's wise to test a sample patch or use online tools that simulate colors in different light settings to avoid surprises.
- Appliance Paint (Optional but Recommended): For an extra layer of durability and a finish specifically engineered for appliances, consider using specialized appliance epoxy paint. While slightly more expensive than regular metal paint, it's designed to withstand the unique wear and tear a fridge experiences. Many DIYers have reported excellent, long-lasting results with these products.
- Optional: Sandpaper (120-grit medium): If your fridge has any rust, peeling paint, or a very glossy finish that needs scuffing for better adhesion, a medium-grit sandpaper (around 120-grit) will be useful. A light sanding can help the primer bond more effectively.
- Optional: Clear Protective Sealer/Topcoat: For the ultimate long-lasting finish, especially in busy kitchens, applying a clear protective sealer or topcoat designed for metal after your paint has cured is a great idea. It adds an extra layer of protection against scratches and impacts, though it's not strictly necessary for a successful project.
- Drop Cloths/Tarps: Protect your floors and surrounding areas from accidental drips and splatters. Old bed sheets, cardboard, or even trash bags can work in a pinch.
- Painter's Tape: Essential for masking off areas you don't want to paint, such as handles, hinges, seals, and the refrigerator's interior edges.
- Cleaning Supplies: Degreaser, dish soap, clean rags, and water are vital for proper surface preparation.
- Ventilation Mask and Gloves: Always prioritize safety when painting.
Step-by-Step Guide: How to Paint a Refrigerator Like a Pro
With your equipment ready, let's walk through the process of transforming your refrigerator. Patience and thorough preparation are your best friends here.
Step 1: Prepare the Refrigerator – The Foundation of Success
This is arguably the most crucial step. A poorly prepared surface will lead to a poor finish, regardless of how good your paint is.
- Empty and Unplug: Remove all contents from the refrigerator and freezer. Unplug the appliance and let it sit for a while to reach room temperature.
- Move and Ventilate: Carefully move the refrigerator away from walls or other furniture to provide ample working space and prevent accidental paint transfer. Ensure you're working in a well-ventilated area. Open windows and doors, or use fans.
- Clean Thoroughly: This cannot be stressed enough. Use a strong degreaser or a mixture of dish soap and water to thoroughly clean all exterior surfaces of the fridge. Pay special attention to any grime, food residue, or oily spots. Rinse with clean water and allow it to dry completely. Any lingering grease will prevent paint from adhering properly.
- Masking: Use painter's tape to carefully mask off handles, hinges, rubber seals, dispenser areas, brand logos, or any other parts you don't want painted. For handles, consider unscrewing and removing them entirely if possible, as this allows for a cleaner finish and potentially an upgrade later.
- Protect Your Space: Lay down drop cloths or tarps under and around the refrigerator to catch any drips or overspray.
- Optional Sanding: If your fridge has a very glossy finish, minor surface rust, or areas of chipped paint, a light sanding with 120-grit sandpaper will create a better "key" for the primer to adhere to. After sanding, wipe down the surface thoroughly with a damp cloth to remove all dust, then let it dry.
Step 2: Priming for Perfection
Once your fridge is clean, dry, and masked, it's time for primer.
- Apply Primer: Using your foam roller (or brush if preferred), apply a thin, even coat of your metal-specific primer to all surfaces you intend to paint. Aim for full coverage without creating thick puddles or drips.
- Dry Time: Allow the primer to dry completely according to the manufacturer's instructions. Rushing this step can lead to poor adhesion of your topcoat. Many primers require several hours to dry fully.
Step 3: The Color Transformation
Now for the exciting part – adding color!
- First Coat of Paint: Once the primer is dry, apply your first coat of metal paint. Again, use thin, even strokes with your roller. Resist the urge to apply a thick coat, as this will lead to drips and an uneven finish.
- Drying Between Coats: Allow each coat of paint to dry completely before applying the next. This typically takes a few hours, but always follow the manufacturer's recommendations. Patience here will pay off with a smoother, more durable finish.
- Subsequent Coats: Most refrigerators will require 2-3 coats of paint to achieve full, opaque coverage and a rich color. Apply each coat as thinly and evenly as possible.
Step 4: Optional Sealing and Finishing Touches
You're almost there!
- Optional Sealer: If you've chosen to use a clear protective sealer, apply it after your final coat of paint has completely dried and cured (this might take 24-48 hours depending on the paint). Follow the sealer's instructions for application and drying times.
- Remove Tape: Carefully peel off the painter's tape before the paint has fully hardened, ideally when it's dry to the touch but still slightly pliable. This prevents the tape from pulling off dried paint along with it. If the paint is fully hard, score the edge of the tape with a utility knife before peeling to ensure a clean line.
- Reattach Handles/Details: Reinstall any removed handles or other components. This is also a perfect opportunity to upgrade your handles for a truly custom retro feel!
- Curing Time: Allow your newly painted refrigerator to cure for at least 24-72 hours (or longer, as per paint instructions) before heavy use or plugging it back in. This allows the paint to harden completely, maximizing its durability.
Beyond the Basics: Tips for a Flawless Finish and Customization
To ensure your DIY retro refrigerator stands the test of time and truly embodies that Smeg-style flair, consider these additional tips:
- Weather Matters: Humidity and extreme temperatures can affect paint drying and adhesion. Aim to paint on a mild, dry day.
- Layering Colors: For a truly unique design, consider painting the main body one color and the handles or an accent strip another.
- Handle Upgrades: Swapping out standard handles for chrome, brushed nickel, or even vintage-style pulls can dramatically enhance the retro look. You can often find affordable options at hardware stores or online.
- Stencils and Decals: Take customization a step further with stencils to add patterns, or use durable vinyl decals for logos or graphic elements.
- Appliance Paint vs. Regular Metal Paint Revisited: While regular metal paint can achieve beautiful results, appliance-specific epoxy paints (like those mentioned in the Young House Love experience) are engineered for extreme durability and resistance to wear, moisture, and temperature fluctuations, making them an excellent investment for a high-traffic appliance. Consider this if longevity is your top priority.
- Touch-Ups: Keep a small amount of your leftover paint for any future touch-ups.
For more detailed methods and creative ideas to personalize your kitchen, don't forget to explore Transform Your Old Fridge: Simple Methods for a Custom Kitchen Design.
Conclusion
Transforming your old refrigerator into a stylish, Smeg-inspired centerpiece for under $40 is a rewarding DIY project that proves you don't need a massive budget to achieve high-end aesthetics. By following these steps and paying attention to preparation and material choices, you can create a truly unique appliance that not only serves its purpose but also acts as a vibrant focal point in your kitchen. Say goodbye to dull, uninspired appliances and hello to a personalized, retro-chic refrigerator that reflects your taste and adds a joyful splash of color to your home. Grab your roller, pick your favorite shade, and get ready to fall in love with your kitchen all over again!
